Posts

Showing posts with the label Office 365

Publishing documents in Modern UI
Image
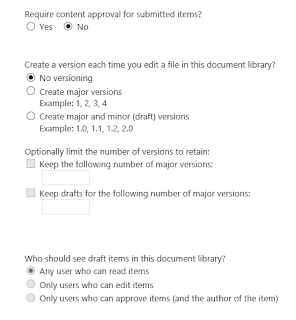
Yesterday at a client I got the question if it's possible to publish documents in Modern UI and if it's possible to only show documents that have been published. In the good old Classic UI days everyone would jump and say "YES, that's possible". However in Modern UI I was a little sceptic. What is possible concerning Publishing and can users only see documents that have been published. Want the short answer? NO, there is no publishing mechanism in Modern UI and NO it's not possible to show documents (default feature) that have been published. Now the long answer. We all know the settings in the classic document library that you need content approval and that users can only see draft items when: - Any user who can read items - Users that have contribute permissions - Users that can approve or the author However in Modern UI these features don't work. Microsoft introduced a "Sign-off" workflow that can be used to approve item...

AIP labels in Office 365 labels

Image
I just kept thinking why can't I just use the Azure Information Protection (AIP) Label as an Office 365 Label. If you think about it using the AIP label sounds so logic. You have the security with AIP your data is encrypted and secured. However you want to enable other things like Data Loss Prevention (DLP) on the content Making an AIP Label visible in Office 365 label is not possible at this moment BUT Microsoft is working on it. I heard the planning is somewhere end of Q1 2018 or later. I understand from Microsoft standpoint that it's not easy combining a tool they bought (AIP was bought from Secure Island back in the end of 2015) with other technology the fact they got AIP up and running so quick is a big achievement.  In a demo they gave during Ignite 2017 Microsoft showed that it is going to be possible to combine AIP and labels so that's pretty cool. You can find the video here . I created an image so you get an idea of what I'm talking about. Left is AI...

PIM part 2

Image
What a way to start of the month with another Blog on Privilege Identity Management (PIM), great stuff! In my last blog on PIM  here  I talked about some of the features that are possible. In this blog I want to talk about whats inside, how does it look and feel. Let's start by the beginning. PIM Starting 1. Activating PIM - to do this you should have Azure AD premium Plan 2! If you don't have this you can request a 30 day trial. Once you have that up and running the next step is to activate PIM. 3. There you go that wasn't very hard now? Let's continue by selecting the Role you want to define further. Click on "Global administrator" and click on Next. 4.You can now choose the people you want to make eligible for this role. Note: Eligible means this person only has this role for a period of time not permanent. 5. Click on Next to see the last screen and to confirm by clicking Ok.  Your all done now. So now you enter the PIM environment. The...

PIM (Privileged Identity Management)

PIM(P) your role Sometimes you just come across an awesome feature in Azure. I find PIM (Privileged Identity Management) to be one of them. Let's discuss a scenario. Your the IT Manager of a big/small company and want to have someone from outside/inside the company to create something in Office 365. However you want to prevent this user from being able to have Admin credentials after the job is done. Normally you would have to keep an overview of who has admin rights in Office 365 and remove the permissions once their done. Here is where Privileged Identity Management comes into place. I've had a few companies that granted me Admin rights but once I was done didn't take me of the list. I could access the admin center even a YEAR  later. I told them but this could have been prevented by using PIM. Question: Do you keep track of everyone that is Admin of some sort in Office 365 (e.g. Global, SharePoint, Exchange, Skype etc.)?  I find PIM a good way to manage this...

Reset Log-in SharePoint Designer

Image
I had been looking for a way to "reset" SharePoint Designer so it would ask me for my credentials again. After a lot of searching on the web I came across this tip and it worked! Step 1: Go to User Accounts in the control panel > User Accounts and Family safety > User accounts Step 2: Click on Manage Credentials in the left menu. Step 3: Click on Windows Credentials  to see the list of sites that Windows has stored your credentials for. Step 4: In the list find the account that you want to remove. Select it and click on remove . Step 5: Restart SharePoint Designer and click on the site you want open. SharePoint designer should ask for your credentials now. Credits go to: http://stackoverflow.com/questions/1098282/sharepoint-caches-incorrect-credentials

Content approval ID's

When you have content approval activated on your library and you want to use a workflow, the following statuses are being used. Status ID Approved 0 Rejected 1 Pending 2 Draft 3 Scheduled 4 This makes it easier to use workflows in combination with the content approval. Do keep in mind that when you are to update the metadata of the item you are "approving" once you update the item the status will be put back to "Pending".

Application Insights Azure portal

Image
So here is the thing. I want to have some analytics on SharePoint online but I don't want to use Google Analytics. I know there is an Office 365 adoption package for PowerBi, been there done that. However I'm missing 1 big feature! That one feature is: User flow User Flow Google Analytics Where do users go when they're on SharePoint? What do they click what pages do they visit? I want to know where the users go in en come out again. Sure with Analytics of Office 365 in the Admin portal or the Adoption package you get a good sense of what is happening in your tenant but you never really know what path they walk. So let's get the grocery shopping list: Data, we need the data. Where do I find the correct data? Ok we need a dashboard, PowerBI Desktop should do the trick We need the Sankey Diagram, that's the diagram Google Analytics also uses Well part 1 is hard to find, I'm not sure if I'm looking in the right spot but I found Application Ins...

Teams Planner or Planner

Image
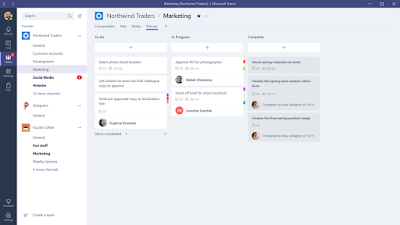
The most of you might know is that Microsoft Teams has a planner and there is also a "Planner" in Office 365. Planner in Microsoft Teams Planner in Microsoft Teams is pretty easy going, no charts or Group by functionality. Sure the Buckets are there but that pretty much it. If you open a task you get pretty much the interface like on the Office 365 environment but you miss the comments part. There is a separate button to open the conversation tab, but that is it. I'm using Microsoft teams for a while now but I always go back to Office 365 to use planner because of the options it has. Microsoft Teams Planner Planner in Office 365 The first thing that might be noticed once you get to Office 365 is that the channels in Teams are not separate task boards in Planner. Instead at this moment they are not even visible, you just have to click on My Tasks to see the other tasks that are coming your way. A little weird but I bet Microsoft is thinking of a way to fix th...

Delve App

Microsoft has a lot of different Apps that can be installed. The list sometimes seems endless. My favorite by far and most useful is the Delve App. There are different reasons: All the phone numbers of all your colleagues All the files that colleagues are working on An overview of the files your working on A list of colleagues right there to use  Sure if you work a company that's small you'll have all the phone numbers in your phone. But just sometimes your missing someone, then this will help. I had an issue myself this morning where I arrived at a customer but there was no one to pick me up. I new one person I could call but he wasn't there, he gave me name but I didn't get his number. Now with the Delve App I was able to find the person, call him quickly and let me get picked up and get to work. Easy as that.

Sentiment e-mail scanner

Image
Just say you want to take action on e-mails that have a negative feel to it. Your doing a bad job and you're getting complaints from people but you actually don't want to see them or take action on them. With the cognitive services from Microsoft you can scan the e-mail and the AI will decide if it's a positive e-mail (1.0) or negative (0.0). I hooked up the sentiment scanner to my Flow to scan my e-mails in Office 365. If I got a new e-mail I would get a notification from the Flow App on my phone telling me of the score (Between 1.0 (positive) and 0.0 (negative)). Pretty cool! Set-up can be a little complicated especially the cognitive service. Go to:  Cognitive service  and log-in with you Microsoft account to subscribe for a trial license. Add the key to the Flow to enable it. Now the fun part is the testing! So I sent myself bad e-mails: 1.  Damn Alex you are not doing good work at this moment! - Score: 0.834 2.  F*** you Alex you S*** big time! - S...

Modern UI Office 365

Image
I've been using ModernUI for a while now. I love the way Microsoft made SharePoint so much easier. Remember the time that you had to say click here click here to insert the webpart, now just click "Edit" and press the + sign where you want. Easy as that! The learning curve is getting a whole lot less steep.  I haven't had the chance to give workshops around ModernUI but I'm willing to put this to the test and see if it's intuitive enough. Default feature: The news! The first thing on the ModernUI site you see is the huge grey bar. Ok Microsoft haven't finished this part of the site yet. In the Delve blogs you can adjust it easily but not in ModernUI YET! If you look past the grey bar you see the News webpart and the Site activity, nothing more! The times I had customers saying "we want news on the homepage" well there you go! Clean and once you click on "See all" it shows you even more news in a neat list. It's a smart webpar...

Local time zone Office 365

Just a heads up, because you are using Office 365 which is of course cloud based it could be that the time zone is not correct. Do the following steps: 1. In your main site, click Site Actions. 2. Click Site Settings. 3. On the settings page, under Site Administration section, click Regional settings. 4. In the Time Zone section set the Time zone drop-down list to the appropriate zone for you. 5. Check the checkbox All sub-sites inherit the time zone this will make sure every sub-site has the same time zone. BUT! If you build a new sitecollection you have to set the timezone again! 5. Click Ok